Sunday, December 7, 2008

Cucumber Raita


ok this one is one of the simplest dish to make.and very low cal and very very healthy.

this is what you do.take cucumber and chop it into small pieces (you can substitute cucumber with anything of your choice...fruit, onions and cucumber....go crazy in your head).add 1/4 cup curd to half cup of this chopped cucumber.to this add salt according to your taste.add a pinch of rock salt.and 1/2 teaspoon of chat masala.and 1/2 teaspoon of chilli powder

and thats it.this shouldnt even be included as a receipe..

Chicken Biryani


Ok now this may not look that good....but trust me this was one of the best things i have made till today...an all time favorite dish of mine whether i make it or whether i eat out...i love biryanis...
though i must warn everyone...i made this dish today and had it.that means my diet for the past 2 weeks has gone down the drain...ok so lets get started...

we will make this in 2 parts.
This is what is used for the first part...the chicken...
Butter....LOTS of it...everywhere
3 onions, sliced
1.5 kg chicken pieces (i used the ones with bones but while i was eating the biryani i realised boneless would have been better)
2 tsp grated ginger
1 whole garlic, crushed
2 tsp of of the mixture of following spices mixed in equal quantities...cumin, cinnamon, cloves, cardamom..i love cinnamon so i was a little more liberal with it.also i like all my spices freshly ground whether i am making biryani or plain sabji at home.
1/2 tsp flour
1 cup chicken stock
1/2 cup yogurt
1/2 cup cream
salt to taste

heat the butter and fry the onions till golden brown.set aside.
take chicken in a vessel and cook it.yes just like that..no oil nothing...after sometime the chicken will secrete lots of fat and then it will cook in its own oil.anyways cook the chicken till its golden in color.set aside.
take oil in another pan (yes i know thats 3 vessels already...there will be more) put in the garlic, ginger, the spices and flour.cook for sometime then add the stock, yogurt and cream and cook continuously.after about 10 minutes of cooking and stirring add the ckicken and half the onions and cook it till the the chicken gets just cooked.remove it and keep it covered...dont want all that aroma drifting away do we?

now for the rice this is what you need.

butter.lots of it.
1/2 tsp saffron
big cardamom seeds...keep them whole
salt to taste
1 cup basmati rice,well washed
4 cups chicken stock


take the butter and heat it.put in the cardamom seeds, saffron and rice.fry it for sometime.put in the chicken stock and boil till the rice is cooked.cover it and let it stand.

now take an oven proof dish.put in a layer of rice.above the layer of rice put the chicken.cover the chicken layer with another layer of rice.above that put in the remaining fried onions.cover and put it in a preheated oven.at 180 degree celcius for 20 minutes.

garnish with roasted cheshewnuts.serve with raita.

yummmmmmmm!!!

Honeyed Roast Chicken


Ok so now that i baked that cake yesterday i got into the cooking mode and well cooked up a storm today...

i made 3 things.all from this awesome receipe book my friend gave me.
the first one was a receipe using quail...but i substituted quail with chicken and i was happy with the result...

Ingredients:
1 tbsp sesame oil
1/4 cup soy sauce (though go a little easy on this one...if used in excess it turns the coating slightly bitter in a muddy way...trying tasting raw soy sauce and you will understand what i mean)
1/4 cup honey
2 tbsp lemon juice
1 tbsp sesame seeds (the receipe didnt call for it but i used roasted sesame seeds)
about 1/2 kg chicken.

To make the coating, put oil, soy sauce, honey, lemon juice and sesame seeds in a small vessel and cook stirring continuously over a low flame...till it thickens slightly.
Boil the chicken in water with a little salt.not to cook the chicken but just to 1/4 cook it (i didnt know what half of semi was..basically i mean boil the chicken for 5 minutes)
Now drain the 1/4 cooked chicken and coat it with the above mixture and roast it..for about 15 minutes or till the chicken is cooked.

So easy no?

Coffee Liquor

For the cake i made yesterday i used coffee liquor...which i am sure available readymade somewhere out there but i decided to make my own...
this is what is needed
4 cup. water
3 cup. (up to 3 1/2 3/4 to taste) sugar
3 tsp. vanilla extract (i read somewhere that 1 vanilla bean (slice lengthwise in 2) can also be used)
1 cup. instant coffee
1 fifth cup vodka

Boil water and sugar for 5 minutes. Remove. Add coffee . Heat to boil; cool for 1/2 hour. Put vodka and vanilla in gallon jug, add other mixture when cool and mix. If using bean, put in dark closet for 6 weeks. If using extract can use immediately. Make 3/4 of jug full.

Can be stored for many days.

Saturday, December 6, 2008

Coffee Liquor...ummm..... Cake

well...it has been a long long time i wrote somethin here.thats because i was bogged down with the thought that i would not put anything sweet up here.but then turns out i stopped cooking altogether...so salty things will have their share sometime later....cuz "i are baking!"

anyways last time my frens had come over i made death by chocolate...that required me to make some coffe liquor.a lot of that had reamined over so i thought i will use it for the new cake i would bake today.

today i am not putting up the ingredients...will move straight to the receipe.so i took frozen butter sugar and one egg and beat them together.i read somewhere that the key to making soft cakes was to have solid butter bits.thats why i used frozen butter...no amount of beating will make it completely smooth.anyways to this pasty thing i added flour, baking powder and soda bicarb (i dunno why they use soda bicarb...but there is one cook show in which the lady who cooks puts soda bicarb in all the baked products she makes...so i thought i would give it a go too)...then over this i put lots and lots of coffee liquor.probably enough to get me drunk if i was to have it neat.anyways it was enough to make the batter into cake like consistency.i put the batter in a greased baking dish (yes its still the square one....we have not actually got down to buying a new one) and baked it in a preheated oven...180 degree celcius for 22 minutes...and this is the result...


the white thing on top is powdred sugar....icing sugar if u must...that i used to visual effects.

i was about to eat it i was like whats a cake without some amount of chocolate in it...so out came my hershey's syrup and well here's the final product...


Saturday, November 22, 2008

Creation Cheese Veggie Pasta


ok so it took me sooooo long to make a non-sweet dish.anyways finally made my own creation...let me name it...umm.. creation veggie pasta...i know thats the most boring name with which a food has ever had the misfortune of bein named...but well the food cant complain.after all it was created by me :D

anyways it was one of those days when i was like i wanna have pasta...and good one at that...now i have this small guy in my house called gokul...he makes pasta...but well his pasta making is like put everything together and put sauce on top....like our local 'chowmein'....strangely it tastes good...but well..

so again i asked my digital best fren google as to what to do...but today he didn help me very much (yes its a he....girls dun like me and vice versa)...he came up with some fancy names which of course wudn b available here....so i went sadly to the kitchen and saw what i had?they were
  • pasta...penne types
  • mozarella cheese...lots of it.... as much as u like..all has to be grated
  • tomatoes...i used 3 big ones
  • garlic...1 whole thing...sliced and chooped....of all things i like chopping garlic
  • processed cheese cube ...1 cube
  • basil...every hindu house has a basil plant...its a religious thing to have.so obviously we ALWAYS have fresh basil in the house (thats y my mom doesnt get very happy when i use basil in food.i particularly like basil leaves in ginger tea.but like i said it is holy so i dun get to have much of that...i dunno what logic.ask mom)...and i was lucky again.since it is winter the lower parts of the plant also had some dried leave...so i had a combination of fresh and dried leaves...i took a handful of it...
  • mayonnaise..i had garlic mayo but i think simple one will also do.
  • olive oil...little bit
  • pepper..according to the taste
  • lastly salt.

i put the pasta to boil.with a little salt.while this was boiling i made tomato puree.and shredded the basil with hand.who's going to waste the smell of the leaves on a knife??after that i heated oil in a pan.once it was real hot i put in the garlic and saute-ed (is that the spelling?basically i just moved it around with a spoon)till it was golden brown.then i added the tomato puree.and let it boil for a while in a low flame.by this time the paste was done.i drained it and washed it with cold water then i mixed this thing with the salt, pepper,shredded cheese and garlic mayonnaise (i think garlic or simple doesnt make much difference...afterall we already used garlic for the sauce).i mixed the thing with my hand.spoon was too difficult to use and anyways i thought the spoon wud break the pasta (the bonus bein i got to lick off the cheese mayo combination)this mixture i microwaved at 540 for 6 minutes (all these temperatures and the time was whatever numbers that tickled my fancy...) while this was being done i put the basil in the tomato sauce..and contiued to cook it in a low flame.i like basil slightly raw thats y i removed the sauce before the leaves actually cooked.you can leave it on till the leaves get cooked completely it doesn make a difference to the taste.this i know cuz when i re-heated the sauce to give the pasta to dad the leaves got cooked completely.i tasted it...not much difference.anyways whatever you sauce is like take it and pour it over you pasta...which should be done by now.then grate a cube of processed cheese over it and microwave it fr about 5 minutes at 360...or till the cheese over the pasta melts.
serve...today my cousins had come over so it was fun eating it...cuz like penelope cruz says 'the most important ingredient is sharing your food with someone you love'.....he he he...ok so i can get pretty ummmm .....cheesy sometimes!

Friday, November 14, 2008

note 2

now mono told me that there are only sweet things on my blog...i wonder what he expected from a sweet person like me.....ok ok.....bad joke...
BUT point taken.next time i will put up something salty...

ps:i also realise that the english in the apple crumble pie is all funny...so from next time i will pay attention to that too.sorry about that one.

Apple Crumble Pie

ok for this one the look of the pie was so sad that i will not put up any pictures...but it tasted really good so i will put up the receipe...its again with the measurement of the ingredients...also the pie crust that i made was really good.like crumbly and all that so i thought everyone should know this one.


ok here's the crust receipe

  • 2 1/2 cups flour
  • 1 cup unsalted butter, very-cold,
  • 1 teaspoon salt (now go easy on this one...i put in 1 teaspoon n my crust was pretty salty....more salty than i would have liked it to be)
  • 1 teaspoon sugar
  • 4 to 6 Tbsp ice water (i had this water ready but i didn really use it....the butter did all the job for me)...

chill the butter.i could skip this part cuz my mom put the butter in the fridge...but in case you are not that lucky i guess 1 hour in the freezer is ok...i wouldn know.
Combine flour, salt, and sugar in a mixer....i guess we can just mix it normally but today i wanted to get all fancy....i even put an apron on...so thats that.Add butter and mix until mixture is like a half kneaded dough...all crumbly to touch and with pea size pieces of butter in it. Add ice water 1 tbsp at a time and knead a dough....the receipe that i was following asked me to knead it such that there wud be cubes of butter in the dough ("thats what makes the pie flaky") but well by the time i kneaded mine all the butter melted....and i didn even need to add the water...after this is done coat the dough with flour and cover it and put it in the refrigerator...i left it there for about 4 hours...not because i thought it was better for the pie but because my mom kicked me out of the kitchen because she wanted to make dinner (its a silent rule that when one cooks the other ones leaves...huh!!)...i left it on for 4 hours but that receipe says 1 hour is enough.again...i wouldnt know.
anyways after 4 hours i removed the dough....the butter in it had frozen so i had to wait for sometime for it to melt...then i rolled it as round as i could manage...onto my mom's borosil square dish (he he he)


and over this crust this is how i made my pie

ingredients

* 3 cups apples - cored and thinly sliced
* 2 tbsp icing sugar
* 1 tbsp cinnamon
* 2 tbsp sugar
* 3/4 cup flour
* 4 tablespoons butter

when you have all this together...

1. Preheat oven to 400 degrees F (200 degrees C.) Arrange apple slices in unbaked pie shell. Mix sugar and cinnamon; sprinkle over apples.i did 3 layers of this...
2. Mix 2tbsp sugar with flour; mix with butter until crumbly. spread this mixture over apples.
3. Bake in preheated oven for 35 to 40 minutes.

after i took out the pie...i let it cool for sometime and spread more of icing sugar cinnamon mix over it...


Banana Nut Bread

this one was something ishu di asked me to make.the way she said it made it sound simple...and well it was simple to make.of course for the details i had to google it but still i made it and i ate it...so down it goes in the history of my blog...

the ingredients were...(now since i googled this receipe i have the measures too...only thing is i halved everything.else my mom will scream saying "u waste while cooking"....sigh sigh)
anyways the ingedients were
* 1 cup sugar
* 1/2 cup butter
* 2 eggs
* 2 cups flour
* 1/2 cup chopped walnuts (i used cardamom and almond..the reults were good with these 2 too)
* 1 teaspoon baking soda
* 3 soft, ripe bananas, mashed

now here's what i did:

added butter and sugar and tried to cream it just like the instructions said.but my butter was frozen so not much 'creaming' happened...so out of frustration i put the butter sugar gooey mixture and the banana and eggs in the mixer and blended them all...i was happy with the result and i happily continued with the rest of the instructions...
to this mixture i added the chopped nuts, baking soda and the flour and made a batter out of this.thing of note...i did not use half tsp baking soda...pooja once told me things dont rise if there is less baking soda..so these days i dont take any chance...anyways.after this i put the batter in a baking vessel (ideally its supposed to be a loaf pan but i will be damned if we get a loaf pan in gangtok....so i used my mom's normal 4 corner borosil baking pan)...baked it at 325 degree farenheit (which google told me was 162 degrees celsius) for 1 hour...


the result was what u see above.....which by the time i post this will be all gone :)

ps: while i was chopping the nuts i found out 2 things...
1.nuts get chopped better with blunt knife...
2.cashewnuts dipped in chocolate spread tastes like heaven...more than that.like angels singing beautiful songs in heaven.but i think this thing should be posted with a warning because the combination of chashew and chocolate spread can be so rich calorie wise that having too much of it will probably send you to...well...heaven :)

Tuesday, November 11, 2008

Note

i posted this recipe a few days back called sabudana soup.that time i didn know the english name for sabudana...but today i asked my electronic best friend (he's known as google...do you know him too???)...so its called pearl sago...
now go ahead and re read the receipe.

Custard Sewai


well...i love sewai.i seriously do.but frankly i am bored with the normal variety....so today i thought i would make sewai with a twist...it was experimental but it worked....

ok this is what i had with me...
sewai (vermicelli)
milk
sugar
almonds
resin
custard
butter
the only measurement needed in this one is that for every volume of sewai you need double the volume of milk...

now take a vessel and put lots of butter.heat it.now add the sewai and in low flame fry (almost deep fry) the sewai....when it becomes slightly red add in the resin and the almonds.now this one was something i tried today...normally i hate the taste of cooked resins and almond...especially cooked almonds.today however i fried these two before cooking them and that made all the difference in the taste.next time i make kheer i am going to do the same....anyways coming back to the sewai...after the resins and almond have been fried for sometime add the milk and sugar keeping behind a little milk for later...let it boil in a low flame till the sewai becomes soft.
take custard (a rough estimation would be one tablespoon for every 2 cup milk) and pour a little cold milk over it to make it liquidy...pour this thing in the sewai thats cooking...cook for about a minute or till the sewai is creamy.
there....thats it.thats all you have to do.

this can be served hot or cold (i like it cold....but thats just me.i like all my milk products cold)...and with any add ons like cream, chocolate etc...


ps:i clicked may pics but i coudn decide which one so i put up 2.
ps:i think adding cardamom to this thing will make it taste better...but i was too lazy to hunt for the cardamom.
ps once again.....as you can make out my camera is ok.....yahoo :)

Saturday, November 8, 2008

Parnami Alu

my mom's speciality...a hot favorite in the house....pretty easy to make.
i dunno why this thing is called parnami alu....parnamis are a sect of hindu people who worship krishna...they are vegetarians...so maybe it was a dish invented by these people...or maybe it is just something they all liked..my mom learnt it from one of the maids who was a parnami...so maybe thats y its called parnami alu....i dunno wat the reason is...the thing is it is nice...and we all love it.

ok then lets get started...
the things you need...ok the amounts i am giving is a rough estimation..for maybe 3 or 4 people

big long potatoes...1/2 kg
mustard seeds...roasted and crushed . it it should be just crushed...nothing more...
cumin seed...roasted and crushed...similar to mustard seed...mix the two spices in equal amounts and take 5 tablespoon of the mixed thing (this is like i said a very rough estimation...cuz i dunno how much potatoes will be there in 1/2 kg potatoes...the general idea is that for every 2 large potatoes add one tbsp of this mixture and yes i know thats a LOT...but still thats how much you need
lemon juice....from 4 lemons (so that the dish is pretty sour)
chilli pepper...around 10 slit into half
oil
salt to taste
yes i know the proportions seem to be all like 'a little too much'...but thats how this dish is....everything to the extreme...thats why though i said 'salt to taste' make sure u add a little extra cuz then all types of taste buds will be utilized. equally.


ok so this is what you do with all these things
wash and slit the potatoes longitudinally.each potato to be slit into 6 pieces.boil the potatoes in a open vessel so that they are just cooked...dont overcook it.keep the peel on...and cut and boil (and not boil and cut).
take some oil in a veseel and heat it.add the chillie pepper and stir for about 1 minute.then add the potatoes and cook it for sometime.add a pinch of turmeric.stir.then add the cumin seed mustard seed mixture.stir.add salt.stir.finally add the lemon juice.stir it thoroughly so that every potato slice is coated uniformly with equal amount of everything that is added.
i know i have written a lot of 'stir'....but when you stir do it carefully...else the already cooked potato will break.

serve hot
yummmmmmmm.

Thursday, November 6, 2008

Sabudana Soup

Now this one is another easy and a quick thing that all can make when hunger strikes dangerously...i would say a must know for all people living in the hostel...

What do u need??
3 tablespoon sabudana (i will edit this with an english name as soon as i find what it is)
1 n half cup milk
1 cup water
1 tablespoon butter
pepper and salt to taste

What do u do...
boil milk and water.when they start boiling pit in the sabudana boil it till the sabudana cooks.stir continuously else the danas will stick to the pan....thats it....its as easy as that...by the time the sabudana cooks the milk also becomes of a soupy consistency.add salt pepper and butter...and have it...delicious nutritious and easy.

ps: for a low cal version use skimmed milk and skip the butter...if you are not calorie consious grate cheese over the soup and microwave it for 20 sec before having it....yummmmmm!!


ps:since my cam isn working rite now i wont b puuting up any pics....as soon as i fix the thing...i will edit the posts and you will see the pics too...

Chocolate Cake in 5 minutes

i just realised that i will be copying many recipes (i realise this is the correct spelling.....i dunno how to correct the spelling in the title :( ) from other people...including the photographs.....i hope none take offence...its just that i am hunting for reipes with simple ingredients which can be found at home on an everyday basis...
and no extensive shopping is required before going to the kitchen....now too much talking....

next recipe is chocolate cake in 5 minutes.
now this receipe is courtesy pooja....my bestest fren....and i must tell u a 1000 time better cook than me...


Ingredients:

4 Tablespoons cake flour
4 Tablespoons sugar
2 Tablespoons cocoa
1 Egg
3 Tablespoons milk
3 Tablespoons oil
1 Mug

Instructions:

Mix flour, sugar and cocoa:

Spoon in 1 egg

Pour in milk and oil, and mix well

Put in microwave for 3 minutes on maximum power (1000watt)

Wait until it stops rising and sets in the mug

Tip contents out of mug onto saucer and enjoy!


now i guess that was easy.i think it will be heavenly if you have it hot...and with some cream on it....or maybe some chocolate sauce....dunno have not tried it but definitely will...soon...

Tuesday, November 4, 2008

Chocolate Pudding Cake

now this one i had to make twice before i got it right...and of course its worth the effort...do you even have to ask??

ok here's what you need...


1 cup all-purpose flour
1 cup sugar
1/4 cup unsweetened cocoa
2 teaspoons baking powder
1/4 teaspoon salt
1/2 cup milk
3 tablespoons vegetable oil
1 teaspoon vanilla


and this is what you have to do...


Combine flour, sugar, cocoa, baking powder, and salt. Add milk, oil, and vanilla; stir well. Spoon batter into an 8-inch square greased pan (now mind it...your pan has to be deep enough...)

Mix an additional 1/3 cup sugar and 2 tablespoons cocoa. Sprinkle over batter in pan. Pour one cup boiling water over the contents of the pan. Don’t stir it!

Bake at 350-degrees for 25-30 minutes (now for technologically challenged like me...and for sould who dont have an oven and use a microwave...preheat your oven at 180 degrees...and then you can bake for 20 minutes at 250 degrees...not as good as an oven...but pretty decent). As the cake bakes, it forms two layers, one layer of sweet, moist cake and another layer of rich pudding. As if that’s not awesome enough, stick a dollop of whipped cream on top. Or, you know, two...

Saturday, November 1, 2008

Old Time Burnt Sugar Cake

This is not a cake; it’s an adventure.


I’m fascinated by old-fashioned recipes, and Burnt Sugar Cake has been on my must-try list for awhile. If you don’t recognize the name of the cake, you would most likely recognize the flavor. It’s a cake you had sometime in your childhood, while visiting older family members or at a church supper somewhere. Burnt Sugar Cake has a unique taste that just spells home and country roads and a day when people spent more time in the kitchen. But there’s a reason Burnt Sugar Cake isn’t so popular anymore–it does take time. There is no cake mix that will give you the flavor of burnt sugar. You have to “burn” the sugar yourself, and make the cake from scratch.

But let me tell you–it’s worth it.

I started out with a recipe from an elderly church lady who has since passed away. The recipe included the list of ingredients, with some measurements (but not all), and directions that were incredibly lacking. (In which she instructs about ingredients that aren’t even mentioned in the list of ingredients and measurements.) You know, it’s one of those recipes–the type where they all knew what they were doing and only halfway wrote it down because you were supposed to know, too. It gave absolutely no instructions about burning the sugar.

Lost, I turned to the internet and studied burnt sugar cake recipes I found online. I chose one and made it…. It was quite different from the “authentic” recipe I had from the elderly lady, but hey, at least it had directions. Unfortunately, the cake was terrible. It baked up dry and dense and just utterly unacceptable.

Not to be deterred, I took what I’d learned from the online recipe and went back to the “authentic” one. Armed with at least a sense of how burnt sugar is created and the process of this cake, I tackled the old-time recipe again, filling in the gaps with my own experience. You know, the experience the incomplete recipe assumed I had to begin with. The two recipes were different in several ways, and by and large my second attempt was based on the old-time recipe. However, where measurements were incomplete in the old-time recipe, I filled in with my own guesses from my baking background, and what I ended up with was a delicious, moist, light cake that fulfilled all my Burnt Sugar Cake dreams.

How to make Old-Time Burnt Sugar Cake:

Making Burnt Sugar Syrup–

1 1/3 cups sugar
1 1/3 cups water

Dump the sugar in a skillet on the stove. Turn the heat to medium-low.

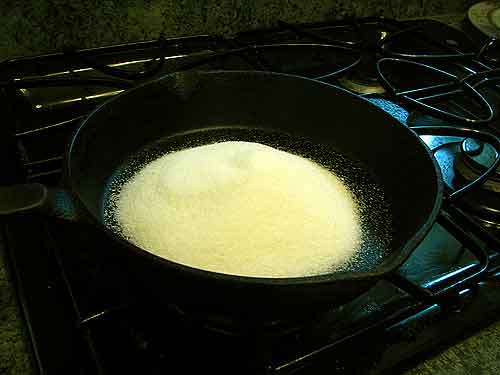
You don’t actually “burn” the sugar–you melt it. The sugar will just…melt. Seriously. Who knew? (Stop laughing. I’m from the suburbs.)

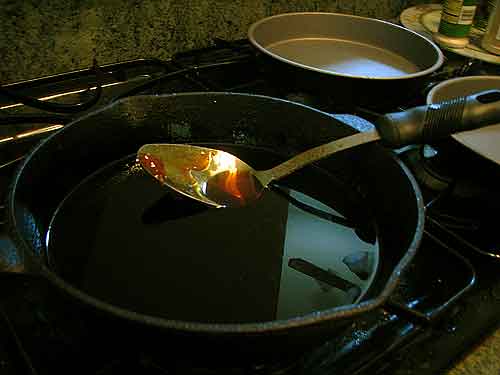
Stir only occasionally. The less you stir, the better. If you can’t restrain yourself, walk away for five to ten minutes and come back. It will look like this.

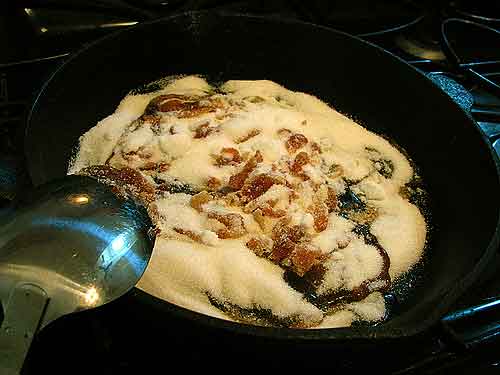
Now add the hot water, continuing with your heat on medium-low. (The online recipe instructed me to boil the water before adding it. This was not in sync with the old-time recipe and it’s not necessary. (Old church ladies know this stuff!) I made the burnt sugar twice, with each recipe, and I’m here to tell you that you don’t need to boil the water. Just use it hot right out of your tap. That’s good enough.

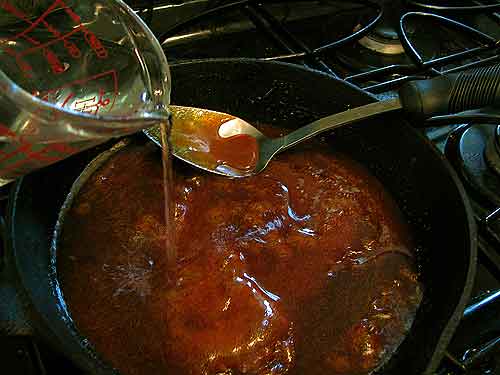
The melted sugar gets all excited when you add the water and it will bubble up.

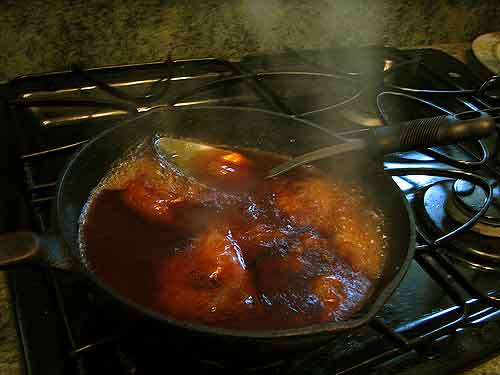
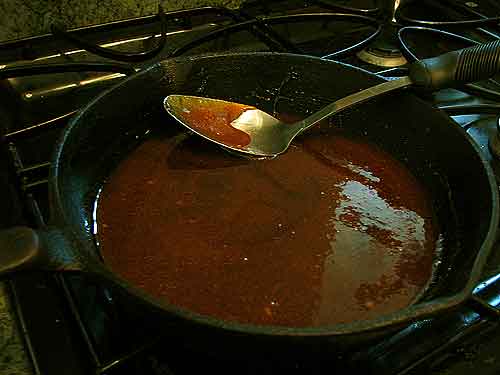
Then it will calm down and after another five to ten minutes (again, it doesn’t like to be stirred too much), it will look like this.

Turn off the heat and set it aside to cool to room temperature while you start preparing the cake. The syrup is thin while it’s hot, but as it cools, it thickens. By the way, if you’re ever snowed in and have to have pancakes, this makes a pancake syrup in a pinch. Add a bit of maple flavoring if you have some on hand and it’s make-do maple syrup. Just remember, however much you want to make, use equal parts sugar and water. You know, if you’re snowed in and have to have pancakes. I wouldn’t want anyone to go without pancakes ever again. It’s an unnecessary tragedy. (Never run out of pancake mix again, either–try my Quick Mix.)

Note: Using 1 1/3 cups sugar and 1 1/3 cups water, you’re going to end up with approximately 1 1/4 cups Burnt Sugar Syrup after it cooks down in the process. Your exact mileage may vary.

Making Burnt Sugar Cake–

3 cups all-purpose flour
2 teaspoons baking powder
1/2 teaspoon salt
3/4 cup butter, room temperature
1 1/2 cups sugar
2 eggs (yolks/whites divided)
1/2 cup Burnt Sugar Syrup
1 teaspoon vanilla
1/2 cup water (minus one teaspoon)
3/4 cup milk

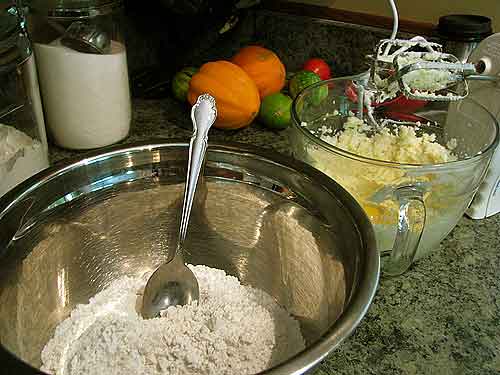
Preheat oven to 350-degrees. Combine flour, baking powder, and salt; set aside. In another bowl, combine room temperature butter and the sugar. Cream. Add two egg yolks and beat again.

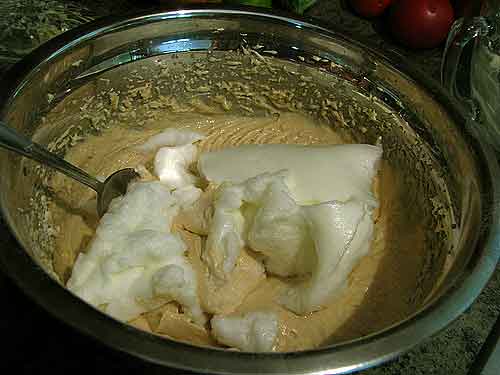
In a small bowl, beat egg whites till fluffy.

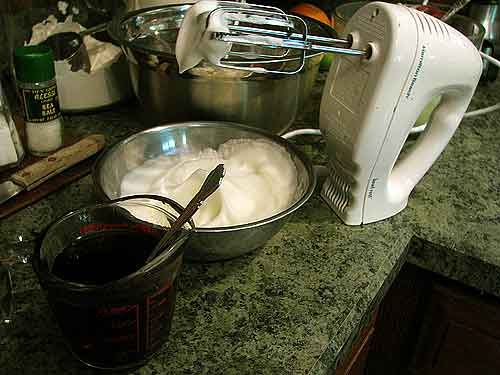
Pour or spoon 1/2 cup of the Burnt Sugar Syrup in a one-cup measuring cup. Add the teaspoon of vanilla then add enough water (cool to lukewarm) to add up to a cup combined with the Burnt Sugar Syrup and the vanilla. To the bowl with flour, add the creamed butter/sugar/egg yolks, the Burnt Sugar Syrup mixture, and the milk. Beat well. Gently fold in the egg whites. (Do not beat again.) The online recipe didn’t call for the eggs to be separated with the whites beaten then folded in. This is an extra step, but it makes a difference. Trust me.

Divide into two round, greased cake pans.

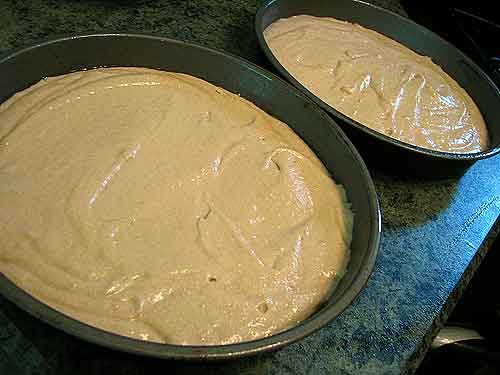
Bake at 350-degrees for 25-30 minutes or until a toothpick inserted near the center comes out clean. (Don’t overbake!)

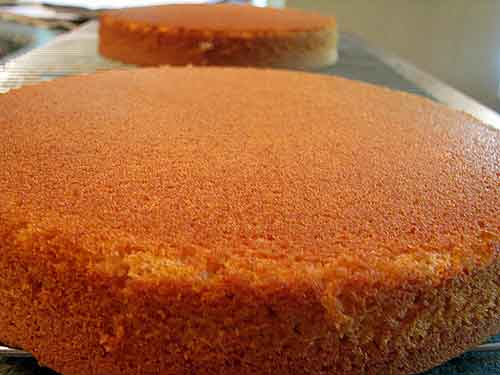
Cool and frost with Burnt Sugar Icing.

Making Burnt Sugar Icing–

16 ounces powdered sugar
2/3 cup to 3/4 cup Burnt Sugar Syrup (however much you have left in the skillet! as noted above, your mileage will vary after your syrup cooks down)
1/4 cup butter, room temperature
1 teaspoon vanilla

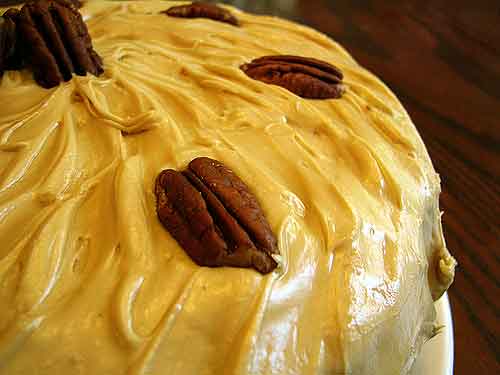
Combine and beat till smooth and spreadable. If your icing is too stiff because you found yourself on the low side with your remaining Burnt Sugar Syrup, add a bit of milk or water. Frost cake and decorate with pecan halves. Serve with vanilla ice cream.

Excuse me while I inhale this cake….

P.S. I don’t use cake flour. Ever. If a cake recipe can’t be made with regular flour, it’s just a bad recipe in my book. When I post a cake recipe, I’m using regular flour and it’s a recipe that works.

P.P.S. I don’t use bread flour, either. Ever. If a bread recipe can’t be made with regular flour, it’s just a bad recipe in my book. When I post a bread recipe, I’m using regular flour and it’s a recipe that works.

P.P.P.S. I’m too frugal for that special cake and bread flour nonsense.

P.P.P.P.S. I just wanted to use another P. The extra P’s are free!